|
Asia-Pacific Forum on Science Learning and Teaching, Volume 16, Issue 1, Article 15 (Jun., 2015) |
Researcher examined the lens topic in current science textbooks in Turkey. And it was determined that the activities in textbooks are not enough for students to learn the subject in-depth and to relate with daily life.
Six science teachers from three cities were also consulted about the current textbooks and the activities prepared by the researcher. Evaluations of teachers were taken with the opinion form which consists of three questions. The questions were: 1. Do you find activities related to the lenses in the present textbooks enough for students to understand the topic and to be able to relate with daily life? Please explain. 2. What are your views on researcher's proposed activities in terms of taking place in the textbook or teachers’ guide book? 3. Can you evaluate researcher’s activities in terms of students’ understanding the topic and their motivations?
Activities prepared by the researcher were applied by a middle school science teacher in his class during the lens topic. After the topic was completed, views of seven voluntary students from class were taken about the activities they did relating to lenses with the opinion form. The question in the form was: What are your views on activities you applied for lens topic?
Guide for middle school teachers about lenses in geometric optics
Divide the students into groups of two or three students to perform the following activities. Also, ask them to discuss what’s happening during these activities. You can use predict, observe, and explain (POE) strategy developed by White and Gunstone (1992) as previous studies (Hsu, Tsai, & Liang, 2011; Radovanović & Sliško, 2013; Rakkapao, Pengpan, Srikeaw, & Prasitpong, 2014) have reported positive outcomes in learning physics topics via this strategy. During following activities, the students can be asked to predict what will happen during activity, observe what they see, and explain reconciliation and conflict between their prediction and observation.
Discrimination of converging and diverging lenses
In this activity, students will distinguish the two types of lenses by looking at the thickness of their center and the edges. Students will observe converging lenses are thicker in the middle than at the edges, while diverging lenses are thicker at the edges than in the middle.
Apparatus
- Converging lens types
- Diverging lens types
Activity
Ø Provide converging and diverging lens types to all groups and tell them to distinguish them.
Ø Ask students to place the lenses between their thumbs and forefingers, and run their fingers from the center of the lenses to their edges.
Properties of lenses
In this activity, students will explore the properties of converging and diverging lenses.
Apparatus
- Hand-held laser pointer (not exceed 1 mW output) or flashlight and plastic comb
- Converging lens
- Diverging lens
Safety precautions: For these activities Class 1 (not exceed 1 mW output) hand-held laser pointer should be used as a training aid. Class 1 lasers the output power is below the level at which it is believed eye damage will occur. Exposure to the beam of a Class 1 laser will not result in eye injury. Class 1 lasers may therefore be considered safe (Public Health England, 2010). However before beginning the activity, please warn your students about laser pointers. Tell them never look directly into a laser pointer and never direct it towards another person. Do not give hand-held laser pointer to students just in case and you apply below activities that require the use of a laser pointer.
vRefractions by converging and diverging lenses can be observed better via laser light as it doesn’t scatter and moves in a straight line. However, if you don’t have a laser pointer or don’t want to use it, you can complete these activities with a flashlight and a plastic comb. You can obtain parallel rays, if you put plastic comb in front of the beam emitted from flashlight.
Activity
Ø First, ask students to hold a converging lens close to an object. Then, students can look through it at something a few meters from the lens. (If you have a large window in the classroom, students can focus on objects outside.)
Ø Ask students to repeat the procedure with a diverging lens.
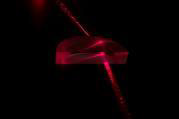
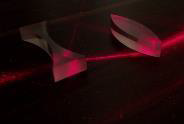
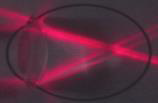
Ø Shine the laser carefully through the lenses. Dimming the classrom lights may ensure easier observation. Starting from one end to the other end of the lenses, ask the students to observe how the paths followed by the light through converging and diverging lenses as showed below (Figures 1-2).
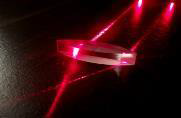
(a) (b ) (c)
Figure 1. Activity of refraction by a converging lens
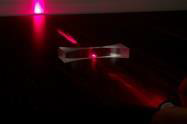
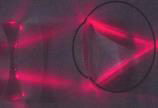
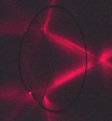
(a) (b ) (c)
Figure 2. Activity of refraction by a diverging lens (a-b) and converging and diverging lenses together (c)
Finding the focal length of a lens
In this activity, students will measure the focal length of a lens.
Apparatus
- Converging lens
- Diverging lens
- White piece of paper
- Ruler
- Light source
Activity
ØAsk students to hold the converging lens up towards the window and hold a piece of paper on the other side of the lens. Then, they move the lens closer to or farther from from the paper until a focused image of the outside or a distant object is formed on paper. Measuring the distance between the lens and the paper, they can determine the focal length of the lens.
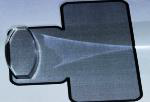
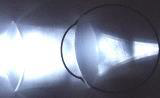
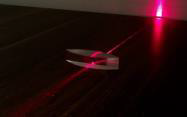
ØAsk students to determine the focal length of a lens using the light source. Direct students to place the converging lens on a white piece of paper and send a beam of light from the
light source. After parallel rays pass through the converging lens, the point where they converge is defined as the focal point for that lens (Figure 3). Students measure the distance from the focal point to the center of the lens.
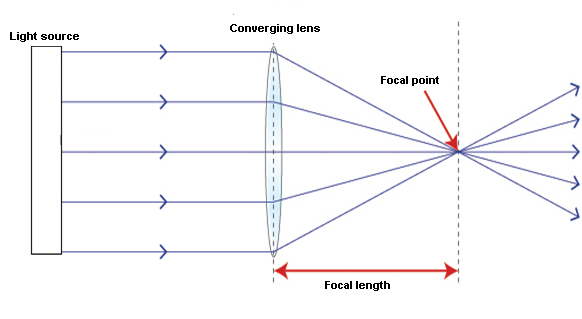
Figure 3. Refraction of light by converging lens
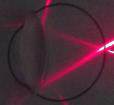
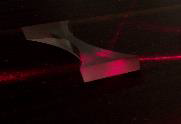
Ask students to repeat the procedure with a diverging lens. Students will observe when parallel rays of light pass through a diverging lens the refracted rays diverge so they appear to come from one point (Figure 4). Direct students to extend refracted rays to this point with a ruler and measure the distance from this point (focal point) to the center of the lens.
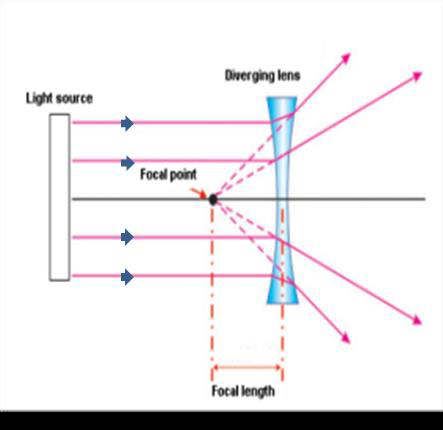
Figure 4. Refraction of light by diverging lens
Refraction of light by lens in our eye and in camera
In this activity, student will observe refraction of light by lens in our eye and function of lens in a camera.
Apparatus
- Converging lens
- Eye model figure (You can draw it easily on a white paper as Figure 5)
- Camera figure
- Light source
Activity
ØAsk students to place the converging lens on eye model figure as shown Figure 5 and send light from the light source. Students will observe light from a distant object focus on the retina for healty eyes.
(a) (b)
Figure 5. Refraction of light (from flashlight (a) and laser pointer (b)) in healty eyes
ØAsk students to repeat the procedure with a camera figure (Figure 6).
ØTell students the structure and opereation of a camera is very similar to human eye.
Figure 6. Refraction of light in a camera
Optical lenses to cure eye defects
In this activity, student will observe eye defects and functions of lenses to cure them.
Apparatus
- Two converging lenses
- One diverging lens
- Eye model figure
- Light source
Activity
ØAsk students to place the converging lens on eye model figure (eyeball is taller than normal eye figure) as shown Figure 7 and send light from the light source. Students will observe light from a distant object focus in front of the retina for a myopic eye.
Figure 7. Light focusing for a myopic eye
ØAsk students to place the diverging lens in front of converging lens (eye lens) as shown Figure 8 and send light from the light source. Students will observe light from a distant object focus on retina.
Figure 8. Cure myopic eye via diverging lens
ØAsk students to place the converging lens on eye model figure (eyeball is shorter than normal eye figure) as shown Figure 9 and send light from the light source. Students will observe light from a distant object focus behind of the retina for a hyperopic eye.
(a) (b)
Figure 9. Light focusing (from flashlight (a) and laser pointer (b)) for a hyperopic eye
ØAsk students to place the converging lens in front of eye lens as shown Figure 10 and send light from the light source. Students will observe light from a distant object focus on retina.
Figure 10. Cure hyperopic eye via converging lens
Making a refracting telescope
From this activity, students will learn the functions of two lenses when they use them together in a refracting telescope. To build a refracting telescope which is made inexpensive and easy-to-find materials also with adjustable focus will be useful for teachers and students.
Apparatus
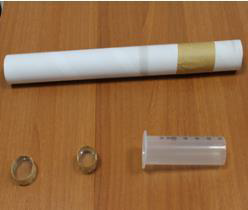
- A cardboard tube (aluminium foil roll helps, if it is long)
- A 50 ml injector
- Two converging lenses of differing focal lengths
(one width is according to the cardboard tube for the objective, the other width is according to the injector for the eyepiece). Lenses can be obtained from an optician.- Duct tape
- Black wrapping paper
Figure 11. Apparatus for refracting telescope
Activity
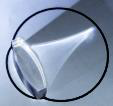
ØDirect students to tape around the little lens and to place in injector as shown on the right side image Figure 12(a)). Now, the eyepiece for the telescope is ready.
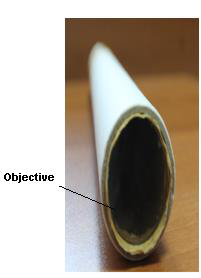
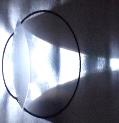
ØAsk students to repeat the procedure for the big lens to place inside the cardboard tube (Figure 12(b)). This is the objective of the telescope.
(a) (b)
Figure 12. Eyepiece and objective parts of refracting telescope
ØShow students how to insert injector into the cardboard tube.
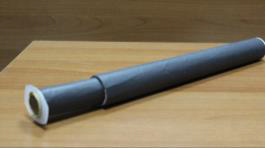
ØAsk students to wrap the cardboard tube and injector with black wrapping paper.
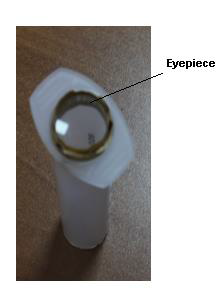
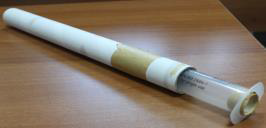
ØNow the refracting telescope is ready (Figures 13(a) and (b)).
ØDirect students to focus on a distant object and to slide the injector tube in the cardboard tube slightly to ensure the image comes into focus.
ØTell students they can also observe the moon and stars at night.
ØWarn students never look at the sun through the telescope since it causes serious eye damage.
(a) (b)
Figure 13. The final version of the refracting telescope
ØStudents may have difficulty understanding the function of the lenses in a refracting telescope. To support this activity and to visualize what is happening inside a refracting telescope you can draw below figure. Also tell students how a refracting telescope works on the figure. Tell them the objective lens collects light from a distant object and brings it to focus. This lens creates a real image of the object. The eyepiece lens magnifies the image created by the objective lens.
Figure 14. Basic optics of a refracting telescope

Copyright (C) 2015 HKIEd APFSLT. Volume 16, Issue 1, Article 15 (Jun., 2015). All Rights Reserved.